Labelling
Beta
Labelling works end to end and has had very few people through it. If something reads wrongly or a key does nothing, tell us — that is the kind of thing that only shows up once people use it.
Sight has its own labelling screen, so the photos, the labels and the model that learns from them all live in one place. You can bring labels in from another tool, do the work here, and take them out again in whatever format you need.
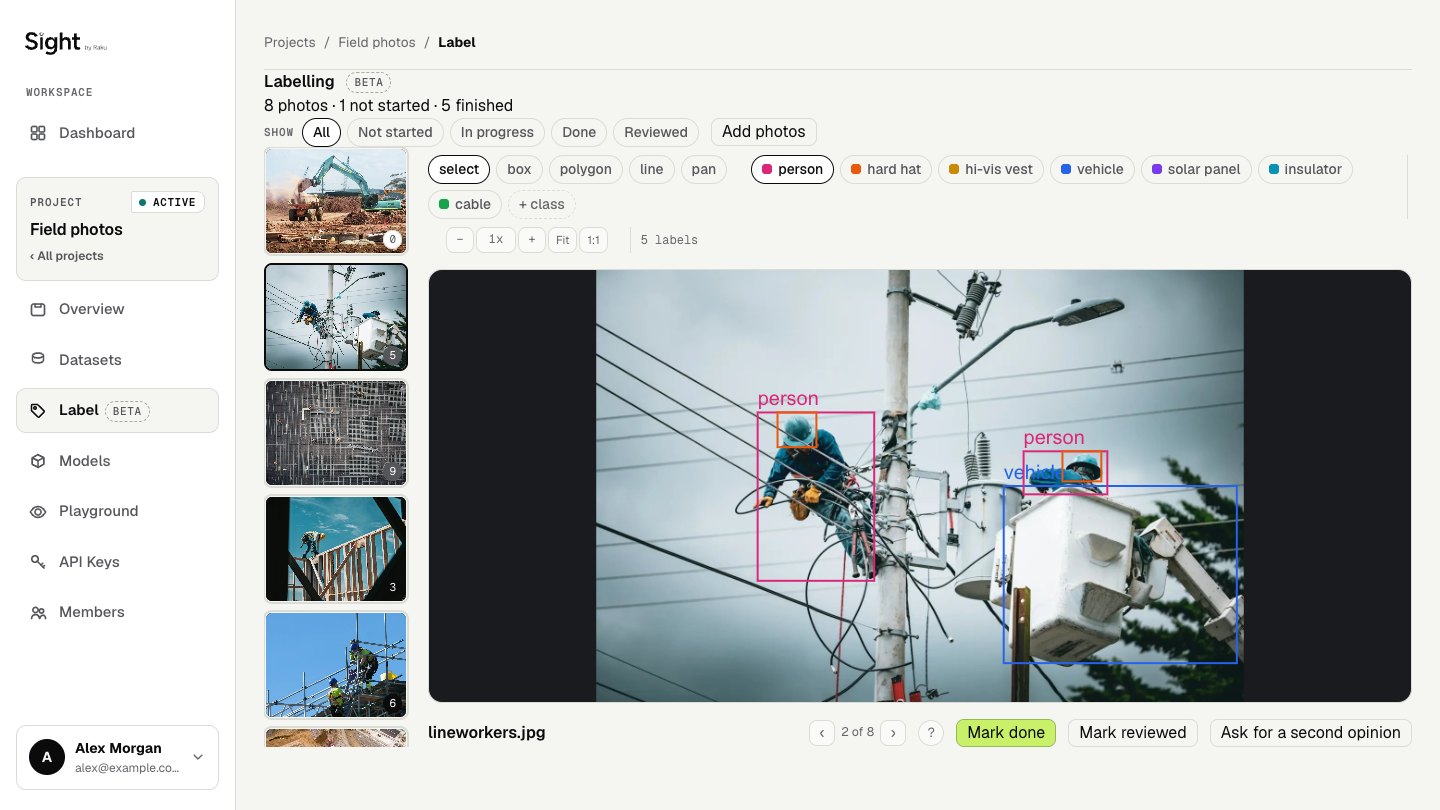
What you can label
| Shape | Use it for | Key |
|---|---|---|
| Box | Anything a rectangle describes honestly — a unit on a wall, a status light | R |
| Polygon | An object with a shape that matters, traced point by point | P |
| Line | A run rather than an object — a cable path, a conduit | L |
| Tag | A fact about the whole photo, with nothing drawn | — |
A line is not a thin polygon. A polygon is closed and has an inside; a cable has neither. A rectangle around a cable crossing a wall corner to corner is about half background, and a model taught from it learns the wall as much as the cable.
Step 1 — Get photos in
There are two ways, and they suit different situations.
Add photos on the labelling screen, for photos on your computer. Drag or pick them; they arrive ready to label.
Import a dataset you have already uploaded to the project, which brings the photos and any labels already on them. If you have been labelling somewhere else and can export a YOLO archive, this is how that work comes across — the boxes arrive as labels rather than as something to redo.
- Press Import a dataset at the top of the labelling screen and choose one of the project's datasets.
- Read what is in it — how many photos, how many of them carry labels, which classes, and how many boxes — before anything is imported.
- Press Import these photos. A line at the top of the screen says how many have arrived so far, and the photo list fills in as they do. It carries on if you leave the page. The line comes from the import itself: when it finishes it says how many photos were added (and how many were already here), and if it fails or stops it says so, in red, rather than "finished".
Importing needs a trainer or above.
The same photo twice
A photo is recognised by its contents, not its name. Adding one that is already in the project does nothing, so you can re-run an import or drop in an overlapping folder without making copies.
Step 2 — Set up your classes
A class is one of the kinds of thing this project labels — ntd_box,
green_light, cable_path. They appear as chips above the photo, and the
first nine are on the number keys.
To add one, press + class at the end of the chips, type its name and press Enter. Esc cancels. Adding a class needs a trainer or above.
Importing a dataset creates the classes named in its data.yaml, matching any
you already have by name rather than making a second one.
Step 3 — Label
Pick a class, pick a tool, and draw. Everything saves as you go — there is no Save button and nothing to lose if you close the tab.
A box — drag across it.
A polygon — click corner by corner, then click the first corner again to close it.
A line — click along it, then double-click to finish. There is no first corner to come back to, which is the difference.
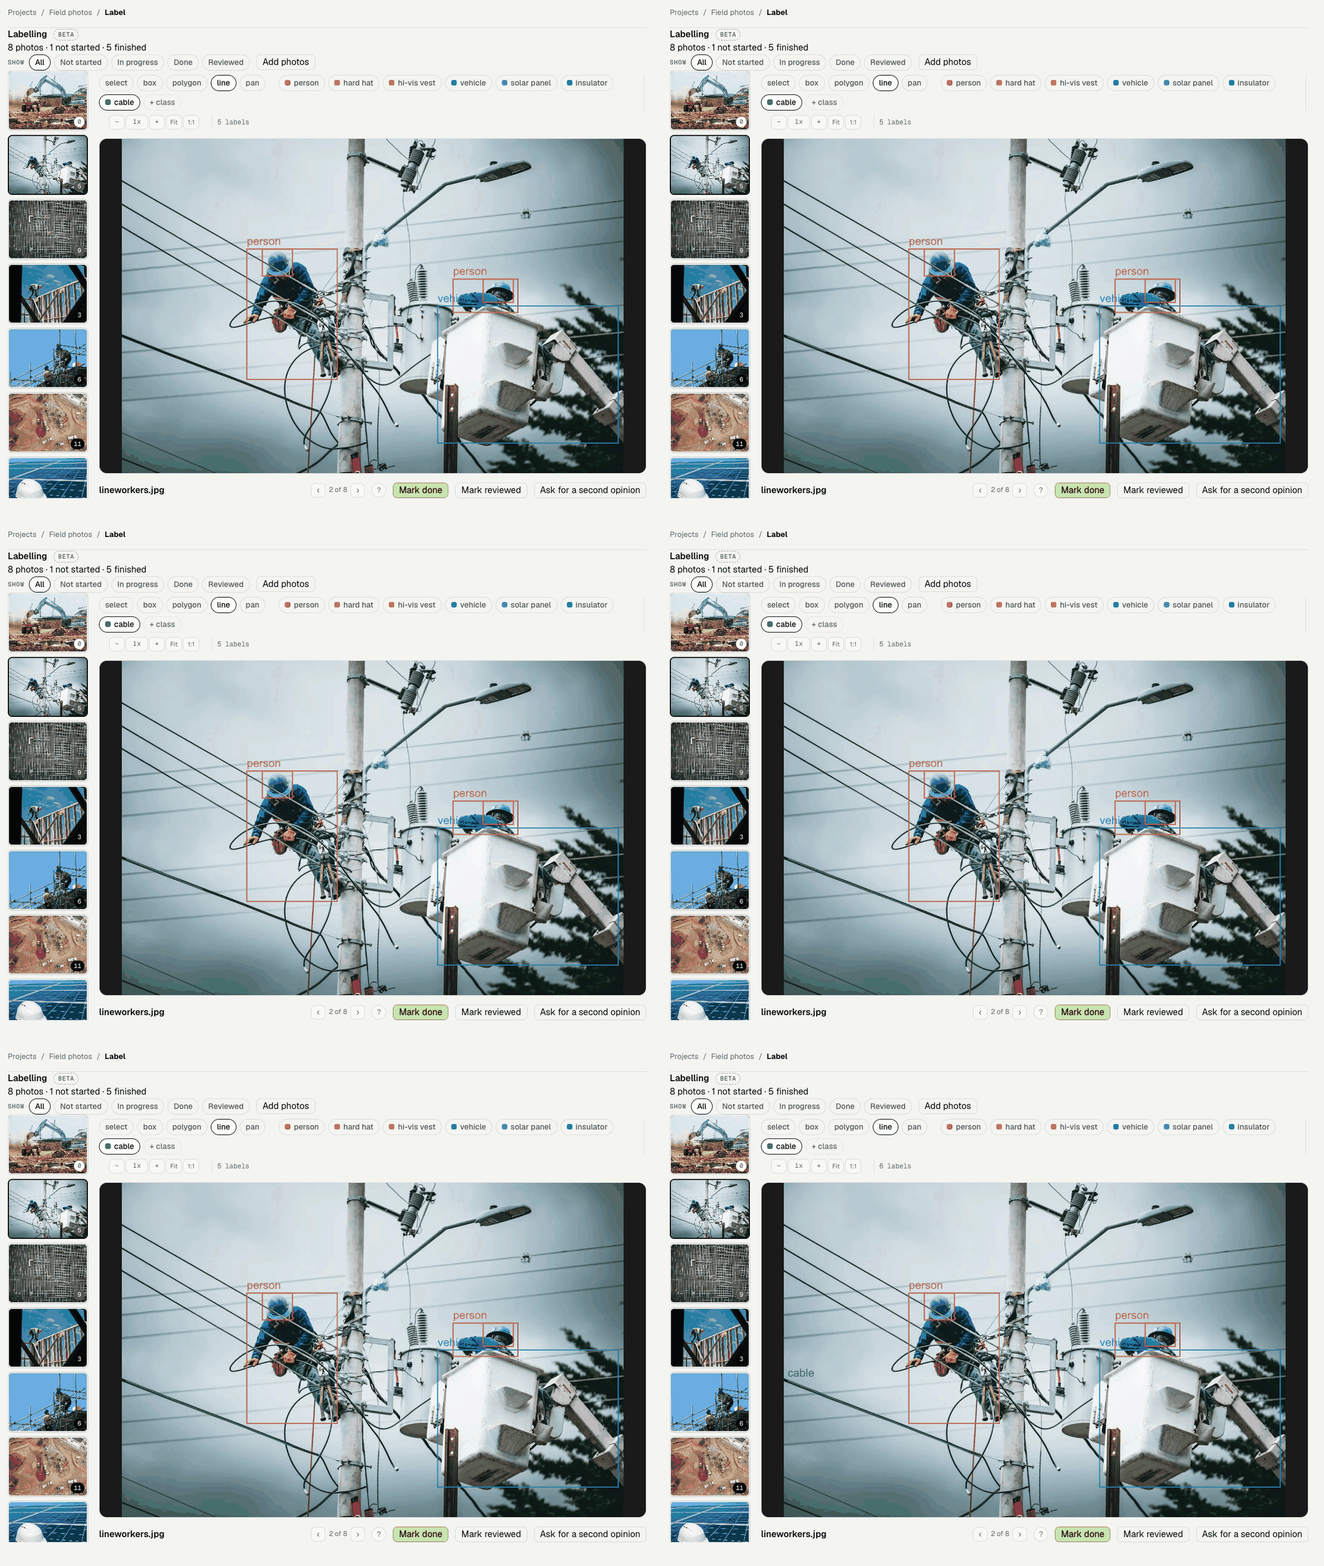
To change something: press V for the select tool, click the shape, then drag it, drag a corner, or press a number key to give it a different class. Alt and click an edge adds a corner; right-click a corner removes it.
Step 4 — Check the model's suggestions
If the project has a live model, it can take the first pass for you. Its suggestions appear on the photo as dashed shapes with a confidence, and your job becomes checking rather than drawing.
| Key | What it does |
|---|---|
| A | Accept the suggestion under review |
| D | Reject it |
| Shift+A | Accept every suggestion on this photo |
| Enter | Mark the photo done and open the next |
A photo whose eight suggestions are all correct is finished with one keystroke. A suggestion is never a label until somebody accepts it — nothing the model says goes into a dataset on its own.
Step 5 — Finish the photo
Mark done says the photo is finished. It counts towards the finished number at the top, and its labels go into the next labelled dataset you save or train on. A box drawn a moment before pressing it is saved first.
Mark reviewed says a second person has checked it. It needs a trainer or above, and a reviewed photo is the one a labelled dataset prefers when a photo has two opinions.
Every shortcut
Press ? anywhere on the labelling screen.
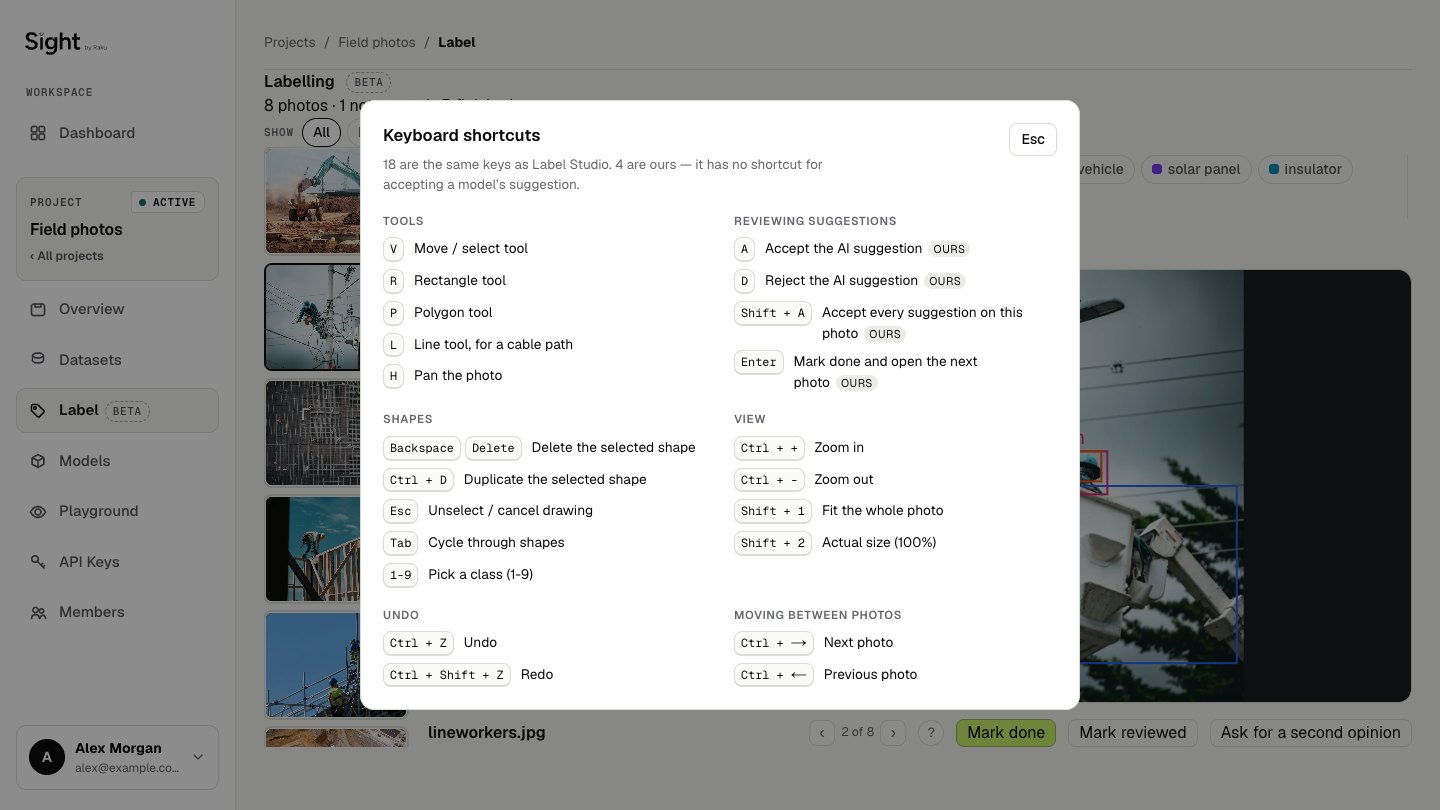
Eighteen of them are the same keys as Label Studio, so if you have worked there your hands already know most of this. The four that are ours are for reviewing a model's suggestion, which Label Studio has no shortcut for.
Two opinions on one photo
Some photos are worth labelling twice — usually the ones a model is least sure about, or where the brief is ambiguous.
Ask for a second opinion on a photo, and the next person to open it sees it blank rather than seeing your labels. An opinion formed after seeing someone else's answer is not independent, and an agreement score built on that would flatter everybody.
Once both are in, the photo shows how much they agree and Compare puts them side by side: shapes found by both in solid green, shapes only one person found dashed in red.
What the score means
Shapes are matched to each other by class and overlap before anything is counted, so two people who drew four boxes each in different places score zero, not full marks. Low agreement usually says the brief is ambiguous rather than that somebody is careless.
Train on these labels
Train on these labels, at the top of the labelling screen, starts a training run on the photos marked done. There is nothing to download and upload again.
- Choose what to train on: the labels as they are now, which saves a new labelled dataset first, or a labelled dataset saved earlier.
- Choose the model: a new one, which you name, or a new version of a model the project already has. A new version trains beside the one that is live; nothing changes for callers until you promote it.
- Read how many photos and labels go in, and how many photos are held back to check the model, then press Start training.
The run joins the same queue as an uploaded dataset and counts against the same plan limits. If a limit is reached (training runs or models this month, or as many runs waiting as your plan allows at once), the drawer says which one and what to do about it before you press anything. Follow the run on the Models page, where each version says what it learned from — Trained on labelled dataset v3, linking to it — or the name of the file that was uploaded.
If nothing is marked done yet, or only one photo is, it says so instead of starting: a model needs at least one photo held back to be scored on, so finish at least two. Training needs a trainer or above.
Labelled datasets
A labelled dataset is the photos marked done, with their labels, saved at a point in time and numbered v1, v2, v3. A model can always be traced to the labelled dataset it learned from, and labelling can carry on without changing one that is already saved.
Save labelled dataset, at the top of the labelling screen, shows how many photos and labels would go in, then saves them as the next version. You can add a note saying why. Saving needs a trainer or above.
The Datasets page shows everything in one place:
- Photos — how many are in the project and how many are labelled, with a link to the labelling screen.
- Labelled datasets — every saved version, newest first, with its date, its photo and label counts and who saved it. Train beside each one opens the training drawer on that version.
- Uploaded datasets — zips and folders uploaded on the Models page.
Taking the labels elsewhere
Each labelled dataset has a small Download zip link, for taking the labels to another tool. Training in Sight never needs it. One zip holds the same labels in every format:
images/ and labels/ |
YOLO, split into training and validation |
data.yaml |
classes, and where the photos are |
coco.json |
COCO |
pascal_voc/ |
one XML per photo |
labels.json |
everything we hold, including who labelled what |
labels.csv and .tsv |
a row per box, for a spreadsheet |
The training and validation photos are always different photos, decided by a hash of each photo's name so a photo stays on its side as more are added. A model checked against photos it learned from scores well and means nothing. On a very small set the hash can put every photo on one side, so, exactly as the training job does, one photo is held back for checking (and every class keeps a training example); those photos go back to their hashed side once the set has grown.
Lines and polygons in YOLO
YOLO's trainer reads boxes, so a line or polygon is written there as the
box around it. The real points survive in labels.json and coco.json —
a cable traced properly is not lost, it simply is not what YOLO is handed.
Not built yet
Brush and mask painting, for things like a crack or a damaged area where neither a rectangle nor an outline is honest. On the roadmap; tell us if you need it and it moves up.